meringa italiana
-
Macaron
COME FARE I MACARON (ITALIANO) Macaron, Macaron, Macaron! The macaron are delicate cookies with a crunchy exterior and weightless interior. Colorful, can be filled with anything from frosting and salted caramel to lemon curd and chocolate ganache. They have conquered everyone’s heart becoming the spearhead of every pastry shop. The version we know today was…
121 gradi, almond flavor, An Easy Macaron Recipe, An Easy Macaron Recipe for Perfect Ones Every Time, colorful macaron, easy macaron recipe, elegance, food coloring, food porn, french macaron recipe, french meringue, french method, french patisserie, gluten free macaron, gusci e coroncina, homemade macaron, How To Make Macarons Recipe by Tasty, italian meringue, italian method, italian patisserie, macaron, macaron cookies, meringa francese, meringa italiana, meringa svizzera, pasticceria, pasticceria italiana, Pierre Desfontaines, suiss meringue, suiss method, sweet treats, tasty macarons, veronese amaretti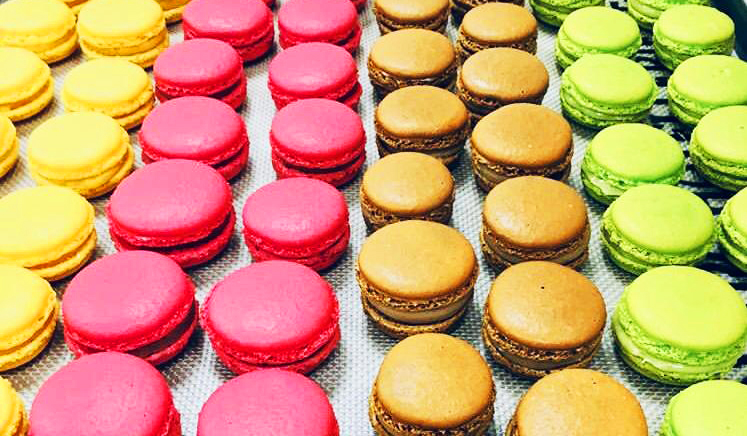
-
Tiramisu’
TIRAMISU (ITALIANO) Oh yeah! We decided to make our great timeless classic: Tiramisu’, the most famous Italian dessert in the world. Of course, as with any iconic dessert, there are a number of variations of the classic recipe. Some people like to sprinkle biscotti (biscuits) throughout the layers to add a bit of crunch; others…
Australia, Best Tiramisu, cacao, Classic tiramisu, cocoa, coffee, cream, crema pasticciera, custard, dessert, Desserts, dolci che passione, easy step for tiramisu, easy tiramisu, famous tiramisu, food porn, homemade tiramisu, how to make mascarpone, how to make tiramisu, Irresistible Tiramisu with Lots of Tips, italian dessert, italian tiramisu, italy, Kahlúa, Lady FInger, Marsala, mascarpone, meringa italiana, pastry chef, pate a bombe, recipes, Savoiardi, Savoiardi Biscuits, sponge cake tiramisu, sponge fingers, step by step tiramisu, sweet moments, the foodie lovers, Tiramisu, Tiramisu al bicchiere, Tiramisu Authentic Italian Recipe, Tiramisu da fare a casa, Treviso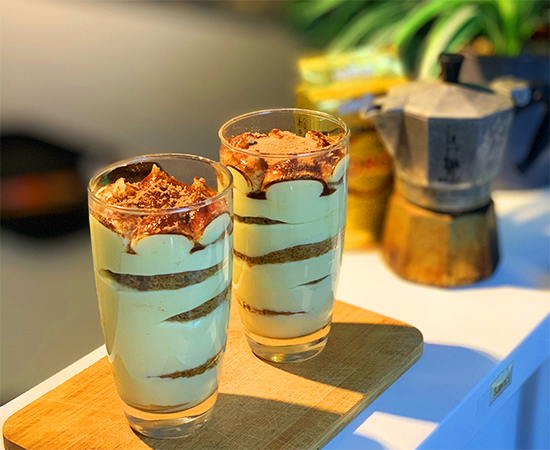
-
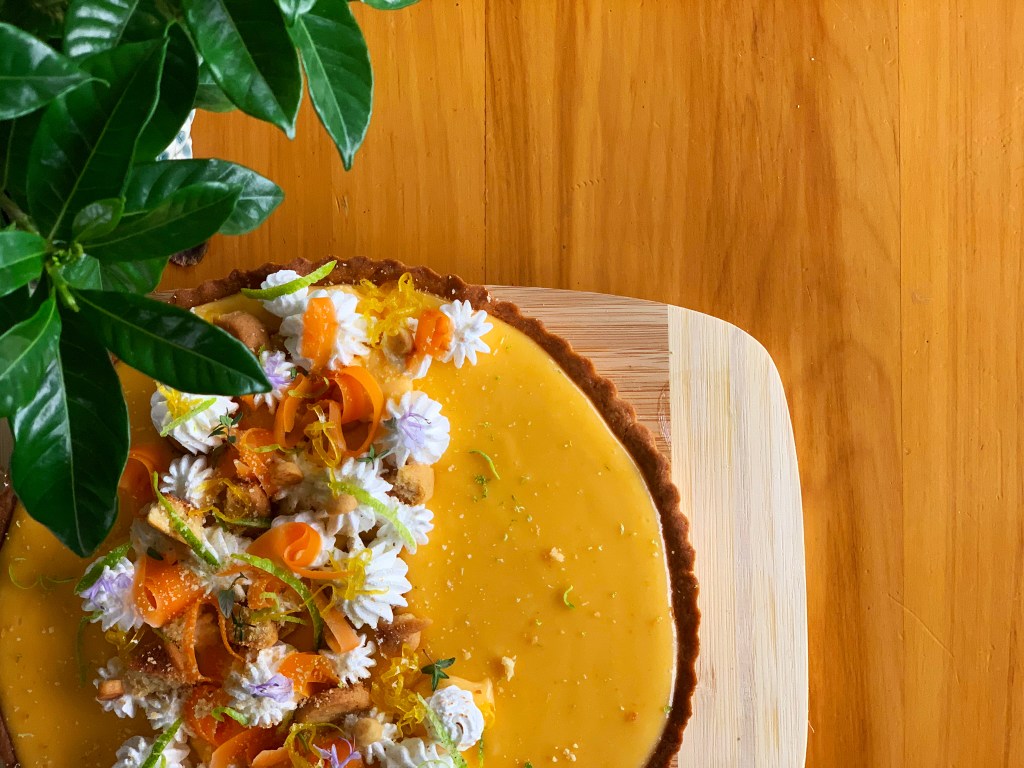
Lemon Meringue Tart
TARTE MERINGATA AL LIMONE (ITALIANO) Being in full swing of citrus season it only makes sense to make one of my favourite tarts ever: the lemon meringue tart. I love citrus fruits because contain vitamin C, reinforce the immune system and are a panacea for the mood. Energizing and refreshing the juicy blood oranges, mandarins,…
121 degrees, amalfi, Anglaise, cannello, crema Inglese, cremoso al limone, crostata, crostata ai limoni di Amalfi, crostata al limone, crostata alla frutta, Desserts, flambe merengue, frolla, frolla friabile, frolla italiana, frolla Milano, frolla montata, frolla morbida, Italian merengue, lemon cremoux, lemon meringue tart, lemon tart, made in Italy, marisa, merengue, meringa, meringa flambata, meringa italiana, meringhe, Milano, organic, pastries, pastry, patisserie, sac a poche, tarte italiana, torch, torta al limone, torta flambata, Vitamin C, zucchero