The Foodie Lovers
-
Peanut Butter Mousse Crunch Cake
TORTA CROCCANTE AL BURRO DI ARACHIDI E CIOCCOLATO (ITALIANO) This Saturday we’ve have been invited for dinner by our friends Mario and Fabio, two friends from Milan, Italy who have lived in Sydney since 3 years now. Pizza will be the Queen of the night but I need to think about a dessert. What should…
american cake peanut butter and chocolate, american dessert cake, australian dessert, burro di arachidi crunchy, burro di arachidi e cioccolato, choco mousse, choco peanut butter cake, choco peanut butter corn flakes, cioccolato e arachidi, corn flakes cake, custard al peanut butter, dominique ansel, mousse al burro di arachidi, mousse al cioccolato, peanut butter australian cake, peanut butter cake, peanut butter mousse, Peanut Butter Mousse Crunch Cake, Torta al burro di arachidi e cioccolato fondente, torta croccante al burro di arachidi e cioccolato, yummy cake chocolate mousse, yummy cake peanut butter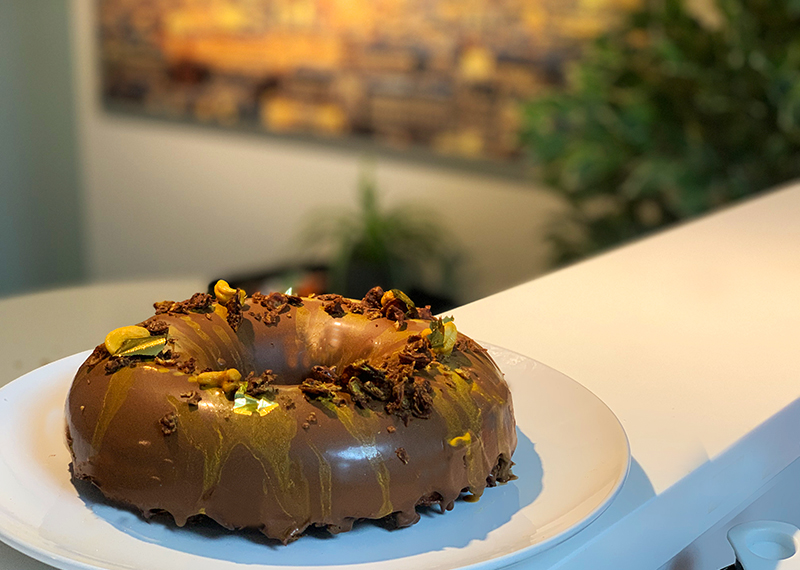
-
Traditional White Bread
PAN BAULETTO (ITALIANO) Soft and fragrant, excellent with salty or sweet toppings, the soft and fragrant white bread lends well to the preparation of toasts and sandwiches. Making it at home is really simple and in addition to having the guarantee of a fresh product, we will not be forced to smell the typical smell…
come fare il pan bauletto, come fare il pancarre, easy steps for make white bread, easy white toast, excellent white bread, how to make bread, how to make white bread, how to make white toast bread, Italian toast at home, pan bauletto morbido fatto a casa, pan bauletto ricetta originale, pan carre ricetta originale, pancarre, pane fatto in casa, pane in cassetta ricetta originale, ricetta pane fatto in casa per toast, sandwich, tips for white bread, toast, tosta pane, white bread, white bread recipe, White Bread Toast, white toast bread original recipe, white toast sliced bread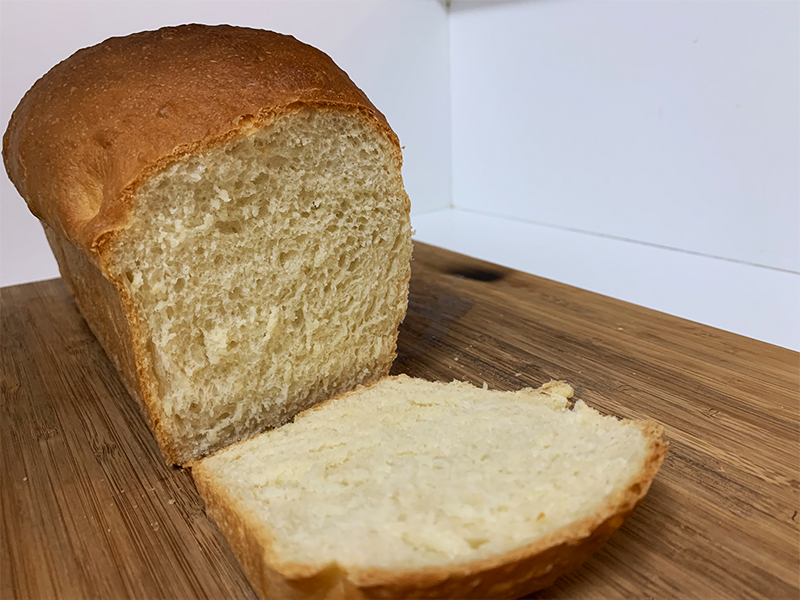
-
Spaghetti alla Nerano
SPAGHETTI ALLA NERANO (ITALIANO) Campania is one of the most beautiful Italian regions and one of the most loved destinations by the world jet-set, especially for Australians. The absolute jewel of the region is the Amalfi Coast, a stretch of coast located south of the Sorrento Peninsula that overlooks the Gulf of Salerno and has…
agerola, amalfi coast, cetara alici, costiera amalfitana, how to make nerano pasta, how to make spaghetti nerano, nerano, parmigiano reggiano, partenopea Cuisine, pasta nerano, pasta recipes vegetarian, pasta spaghetti de cecco, pasta zucchini, provolone del monaco, provolone recipe, secrets and recipes, sorrento, sorrento peninsula, spaghetti alla nerano, spaghetti nerano fried zucchini, spaghetti nerano history, spaghetti nerano recipe, spaghetti nerano ricetta, spaghetti nerano storia, spaghetti nerano trucchi e consigli, spaghetti nerano zucchini, unesco, vegan friendly recipe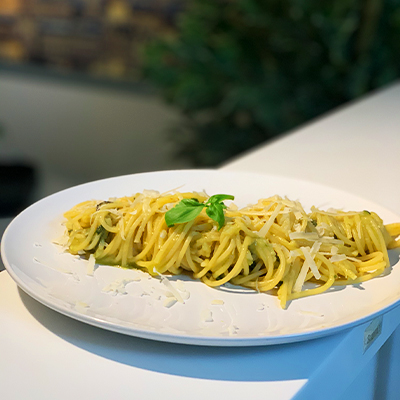
-
Simple tips for perfect homemade pasta
TRUCCHI PER PASTA FRESCA FATTA IN CASA (ITALIANO) Hello guys. In this post we’ll talk about few secrets and tips for making homemade pasta like a star. 🙂 When I make my fresh dough I always use a wood pasta board, because it makes the dough more rough; If you are using the kitchen aid…
come fare la pasta fresca a casa, fresh egg pasta, Fresh Pasta, fresh pasta like a chef, homemade pasta chefs tips, homemade pasta secrets, homemade pasta tips, how to make fresh pasta like an italian, pasta fresca, secrets for a perfect homemade pasta, Simple tips for perfect homemade pasta, tips and secrets fresh pasta, trucchi per la pasta fresca, tutti i trucchi per la psta fresca
-
Macaron
COME FARE I MACARON (ITALIANO) Macaron, Macaron, Macaron! The macaron are delicate cookies with a crunchy exterior and weightless interior. Colorful, can be filled with anything from frosting and salted caramel to lemon curd and chocolate ganache. They have conquered everyone’s heart becoming the spearhead of every pastry shop. The version we know today was…
121 gradi, almond flavor, An Easy Macaron Recipe, An Easy Macaron Recipe for Perfect Ones Every Time, colorful macaron, easy macaron recipe, elegance, food coloring, food porn, french macaron recipe, french meringue, french method, french patisserie, gluten free macaron, gusci e coroncina, homemade macaron, How To Make Macarons Recipe by Tasty, italian meringue, italian method, italian patisserie, macaron, macaron cookies, meringa francese, meringa italiana, meringa svizzera, pasticceria, pasticceria italiana, Pierre Desfontaines, suiss meringue, suiss method, sweet treats, tasty macarons, veronese amaretti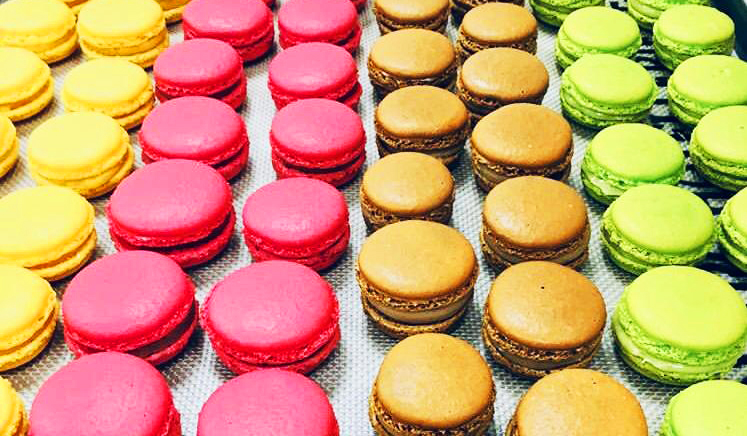
-
Pavlova
PAVLOVA (ITALIANO) There are plenty of tasty and fulfilling recipes you can bake. Also, there are many desserts which we don’t know the origin. Let’s talk about Pavlova. It has been a long standing battle between Australia and New Zealand as to who invented the pavlova. “The Oxford English Dictionary may have settled a long-running…
amore, anna pavlova, anzac day, Australia, ballerina, banana, banana and pavlova, banoffee pavlova, banoffee pie, cantilly cream, chef, come fare la pavlova, Davis Dainty Dishes, dessert, easy pavlova, fluffy pavlova, Hotel Des Indes, how to make meringue, how to make pavlova, how to make perfect pavlova, il dessert della nuova zelanda, kiwi, meringa, meringue, meringue-based dessert, most iconic dessert in australia, most iconic dessert in new zealand, new world, new zealand, nuova zelanda dessert, Oxford English dictionary, pablova banoffee cream, pavlova, pavlova and chantilly, pavlova cake, pavlova is kiwi, pavlova origin, Pavlova recipe, pavlova with fresh fruits, Russian ballerina Anna Pavlova, Se non posso danzare allora preferisco morire, secrets for a perfect pavlova, Swan Lake, sweet dessert, The Hague, wellington, white vinegar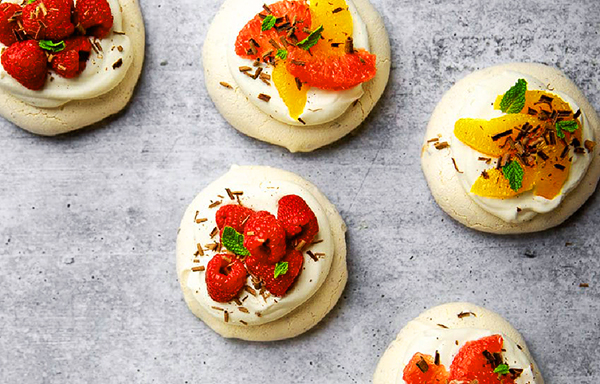
-
Green Tea Biscotti
BISCOTTI DA TE’ (ITALIANO) Who doesn’t love tea and crunchy bikkies? In several posts I spoke about vary kind of pastry and their different structures based on use. When I want sweet and mouth-watering pastries, I choose the FROLLA MONTATA. It si so crunchy because of the high percentage of butter contained and it is…
afternoon, afternoon tea, Australia, bikkies, biscotti, biscotti and teas, biscottini, biscuit and chocolate, biscuits, biscuits recipes, chocolate drizzle, cookies, Desserts, food porn, green tea biscotti, italy, pasticcini, pastry chef, patisserie, recipes, snack, sweets, tea, tea biscuit, tea time, Tea-Scented Breakfast Biscotti, tentazioni
-
Tiramisu’
TIRAMISU (ITALIANO) Oh yeah! We decided to make our great timeless classic: Tiramisu’, the most famous Italian dessert in the world. Of course, as with any iconic dessert, there are a number of variations of the classic recipe. Some people like to sprinkle biscotti (biscuits) throughout the layers to add a bit of crunch; others…
Australia, Best Tiramisu, cacao, Classic tiramisu, cocoa, coffee, cream, crema pasticciera, custard, dessert, Desserts, dolci che passione, easy step for tiramisu, easy tiramisu, famous tiramisu, food porn, homemade tiramisu, how to make mascarpone, how to make tiramisu, Irresistible Tiramisu with Lots of Tips, italian dessert, italian tiramisu, italy, Kahlúa, Lady FInger, Marsala, mascarpone, meringa italiana, pastry chef, pate a bombe, recipes, Savoiardi, Savoiardi Biscuits, sponge cake tiramisu, sponge fingers, step by step tiramisu, sweet moments, the foodie lovers, Tiramisu, Tiramisu al bicchiere, Tiramisu Authentic Italian Recipe, Tiramisu da fare a casa, Treviso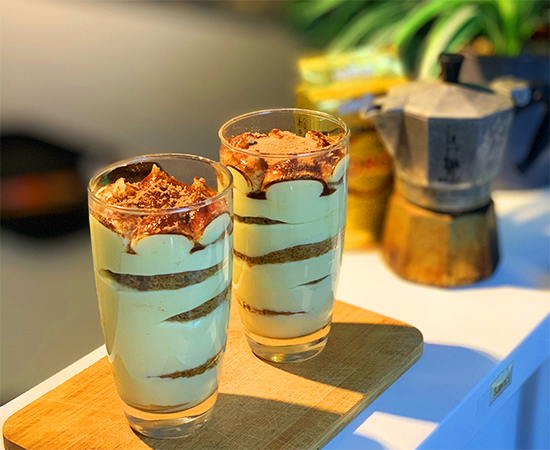
-
Brioche
BRIOCHE (ITALIANO) Breakfast is often described as the most important meal of the day, providing as it does sustenance and energy for whatever activities lay ahead. A soy cappuccino and some biscuits are all the food I can eat as soon as I wake up. In Italy I usually have cappuccino with a nice brioche.…
authentic recipes brioche bun bread, Bakery, bakery bread, breakfast, brioche, brioche authentic, brioche bread, brioche bun, brioches, brush, burro, caolzione italiana, chefs life, colazione, continental breakfast, custard, dough, fairna, food blogger, foodporn, french, homemade, icing sugar, impasto, leavening, lievitati, nutella, pane, pastry chef, recipes, ricette autentiche, sweet tentations, the foodie lovers
-
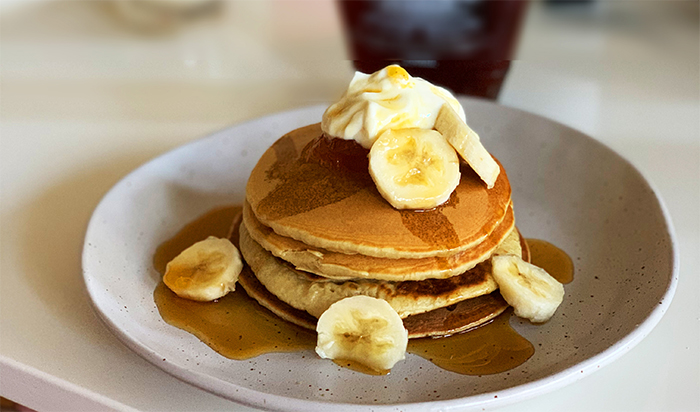
Pancakes
PANCAKES (ITALIANO) EASY, FLUFFY PANCAKES! 🙂 Breakfast is the most important meal of the day but it is often underestimated because we don’t have much time for prepare it and also … who wants to cook something early in the morning? For most of us, it’s not that we don’t have time to make breakfast.…
air holes, american breakfast, baking soda, buttermilk, colazione, colazione americana, dessert, dolce e salato, easy and fluffy pancakes, easy pancakes, food blogger, food photography, food porn, frittelle, fruits, frutta, Greece, maple syrup, pancake, queen maple syrup, Shakespeare, soft, sweet breakfast, the foodie lovers, thefoodielovers